How to Loop YouTube Videos Using OBS
Want a simple "always on" stream from your existing videos? OBS can loop a video and send it to YouTube Live. Below is a clean setup that works for most creators, plus options for looping multiple videos and a simpler 24/7 alternative.

Before you start
- OBS Studio installed: download from the official OBS site.
- YouTube live streaming enabled: first-time setup can take up to 24 hours in some cases.
- A stable internet upload: this matters more than fancy settings.
- Your video file: a normal MP4 works best, but other formats can also be used.
Step 1: Create a YouTube live stream and get your stream key
- Open YouTube Studio.
- Click Create and choose Go live.
- Select streaming software (encoder) mode.
- Copy your Stream key.
You will paste this key into OBS. If you ever need to, you can create a new key in YouTube settings.
Step 2: Set up OBS for a stable YouTube Live stream
You do not need complicated settings to start. The goal is stability. YouTube's general recommendations include H.264 video, CBR bitrate, keyframe around 2 seconds, and AAC audio.
OBS Stream settings
- In OBS, go to Settings → Stream.
- Select YouTube (or Custom if you prefer).
- Paste your Stream key.
- Click Apply.
OBS Output basics (keep it simple)
- Use H.264 encoder.
- Use a CBR bitrate (constant).
- Set Keyframe Interval to about 2 seconds.
- Audio: AAC.
- FPS: 30 is a safe default for most streams.
Step 3: Loop a single video in OBS (Media Source)
This is the fastest way to loop one file. OBS Media Source supports looping.

- Create a new Scene (for example: "Loop").
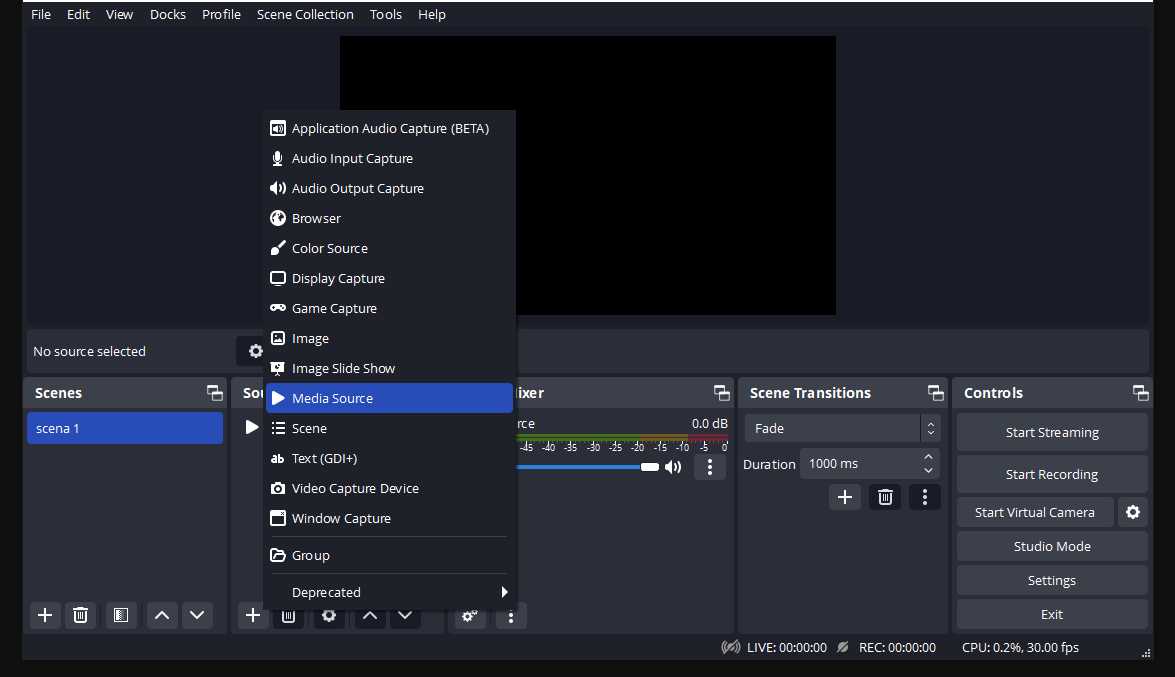
- In Sources click + → choose Media Source.
- Select Local File and choose your video.
- Enable Loop.
- Click OK.
Use Start Recording for a quick test. If the loop is clean in recording, it will usually be clean on stream too.
How to loop multiple videos (playlist options)
OBS does not have a perfect native "playlist loop" for many separate files in the Media Source. You have a few practical approaches:
Option 1: Merge clips into one long file (most reliable)
Combine your videos into one long MP4 and loop that single file. This gives the cleanest playback and usually avoids gaps between files.
Option 2: Use a VLC playlist source
VLC sources can play a list of files. It is convenient, but sometimes you may see small pauses between clips depending on the system.
Option 3: Use OBS scripts or plugins
There are community solutions for advanced rotation and scheduling. They can work well, but they also add complexity.
Common issues (quick fixes)
- Loop has a small stutter: try remuxing the file to MP4, and avoid very heavy codecs.
- Stream stops overnight: check PC sleep mode, Windows updates, and router stability.
- Audio levels jump between clips: normalize audio when you prepare your playlist file.
- CPU usage is high: lower bitrate or resolution, or use hardware encoder if available.
A simpler alternative for true 24/7 loops
OBS is great, but for real 24/7 broadcasting the weakest part is usually the always-on computer. If you want server-based streaming without babysitting your PC, Looping Stream is built for that.
- Upload videos in common formats (mp4, mkv, mov, avi, and more).
- Select a platform preset (YouTube, Twitch, Facebook, Kick, LinkedIn, Trovo, Rumble, DLive).
- We automatically optimize videos for streaming-friendly output.
- Build a playlist, enable shuffle if you want, then go live using your stream key.
Want to skip the always-on PC setup? Start a free Trial and run your first loop from the cloud.
